Who doesn’t love Valentine’s Day?! It’s the perfect excuse to bake something adorable and yummy and then…you guessed it, eat it! Plus, they say the way to a person’s heart is through their stomach and isn’t that what Valentine’s Day is all about – making our friends and family feel loved? I think so!
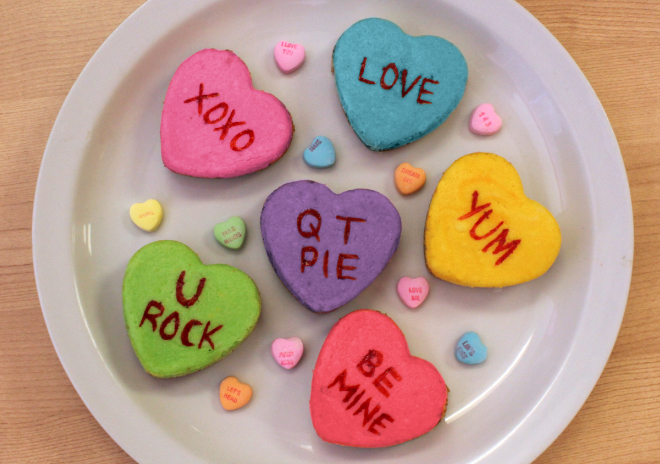
This year I decided to do something a little different. Everyone knows conversation hearts just scream Valentine’s Day and cheesecakes scream yum, so what better way to celebrate than with conversation heart cheesecakes? They are super cute, personal sized, and well…just plain delicious! I can’t think of a sweeter way to show my loved ones that I care. It’s the perfect twist on everyone’s favorite Valentine’s Day candy, but better! Now all you need to do is throw on some tunes, preheat the oven and add a pinch of love!
What you need:
For the cheesecake:
Preheat oven to 350 degrees and place a glass pan filled with water on the bottom rack. This will keep the cheese cakes from cracking.
1. Let cream cheese soften for about a half hour
2. Cream in a mixing bowl until soft
3. Add eggs one at a time
4. Add sugar and continue mixing
5. Add vanilla and sour cream. Mix until well combined scraping down the sides of the pan.
6. Finally add milk and flour
7. Keep mixing until smooth and creamy…….you can’t over mix!
8. Separate your batter into as many bowls as color hearts you want to make. Add 2 drops of food coloring or until your desired color is made to each bowl.
For the crust:
1. Put the desired amount of graham cracker crumbs for the crust at the bottom of each heart.
2. Next add about a tablespoon of melted butter to each and mix.
3. Using a spoon or your fingers, press the mixed graham cracker firmly down to the bottom of each heart creating your crust (the best part!)
Now you are ready to fill each heart with batter and bake!
Bake 30 minutes or until done in the middle (time may vary depending on your oven so keep an eye it)! Turn off oven and leave cheesecakes in for another 30 min with the door cracked open.
Place in freezer over night so they are easily popped out of the silicone heart pan.
Now for the fun part! Using a thin paintbrush and a few drops of food coloring, write your candy heart messages!
Only thing left to do now is eat your heart out! What’s your favorite Valentine’s Day dessert?




These are just too cute!! Love this idea!
Sooo cute! They look perfect
these are so clever and fun!
Hello, Danielle! These are such cuties! They look exactly like those little candies and I’d love to receive one of these ‘grown-up’ versions on V-day!
These are adorable! I love this idea – so creative and cute
Ok these are soooo stinkin cute!!! Love it!